Friday, August 29, 2008

Sketch Challenge

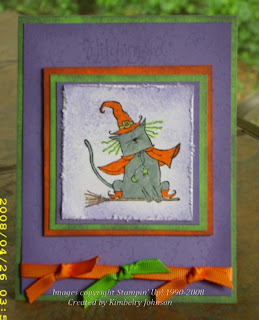
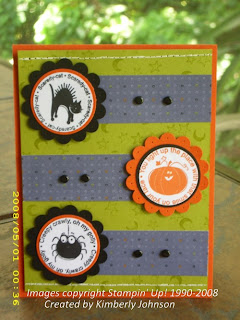
Hi Stampers! Are you sick of all the Halloween cards yet? *wink* The layout for this card came from one of the Sketch Challenges over at Splitcoaststampers. (Click here for the link) This is actually one of the first card sketch challenges I have done. I had a little trouble deciding on what supplies I was going to use for this. I still think it is lacking something, but thought I would post it anyway so you can see that not all cards turn out right on the first try. :0)

Happy Stamping~

Stamp set: Halloween Backgrounds, Batty for You
Ink: Basic Black, Tangerine Tango, Kiwi Kiss
Card stock: Tangerine Tango, Kiwi Kiss, Basic Black, Retired Halloween Paper
Other: Scallop Punch, 1-3/8" Circle Punch, 1-1/4" Circle Punch, Black Brads, Paper Piercer, White Gel Pen

Thursday, August 28, 2008

Happy Boo to You


Hi Stampers! The idea for today's card came from the peek-a-boo cards I featured in this post. I think this card turned out so cute. I admit that quite a few supplies used on this card have been retired, but I just couldn't help myself once the idea popped in my head. The spider image is from the set called Booglie Eyes. It is such a cute set. Unfortunately I couldn't find my wiggly eyes to adhere on. That would have even made the card better, but it's still adorable the way it is. The paper is from a few years back and I wish they would bring it back. It is my favorite of all the Halloween paper I have seen so far. I used the Silver Hodge Podge Hardware around the sentiment and added scallops and ribbon on the right hand side. I will definitely be making more of these in the future.

Happy Stamping~

Stamp set: Booglie Eyes

Ink: Basic Black

Card stock: Tangerine Tango, WW, Retired DSP

Other: Silver Hodge Podge Hardware, Striped Wild Wasabi Ribbon, Scallop Edge Punch, 1-1/4" Square Punch, White Gel Pen, Paper Piercer

Wednesday, August 27, 2008

Fall Pumpkins

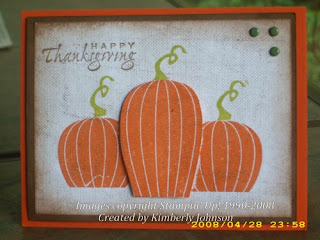
Hi Stampers! If the stamps used on this card seem familiar they should be. It is the same stamp set I used in the card that I posted yesterday. I didn't add the extra faces to them and made the card into a Thanksgiving card instead. I stamped the larger pumpkin in the center of the white panel, masked it and then stamped the smaller pumpkin on either side. I then stamped it again on a scarp piece of white and cut it out. I wanted to give the card a rustic, fall feel so the edges of all the panels are sponged with close to cocoa ink and I used the Linen background stamp to stamp over the images. I wanted to add some sort of embellishments, but ribbon looked out of place so I opted to add 3 old olive colored brads in the upper right hand corner.

Happy Stamping~

Stamp set: Carved and Candlelit, Linen, Holidays and Wishes
Ink: Tangerine Tango, Kiwi Kiss, Cloe to Cocoa
Card stock: Tangerine Tango, Close to Cocoa, WW
Other: Stamping Sponges, Old Olive Brads

Tuesday, August 26, 2008

Happy Boo to You!

Hi Stampers! I must still have Halloween on the brain because each time I sit down to stamp lately everything I create seems to have a fall theme to it! I think that it also has a lot to do with the fact that I love fall. It has always been my favorite season. It is one of the things I miss the most living here in Florida. I grew up in the Midwest (Wisconsin. Minnesota, Iowa, Illinois) and the fall colors up there are amazing. I loved looking at all the trees with their multicolored leaves. I can remember having to rake the leaves and of course couldn't help jumping in once I was done.

Anywho...back to stamping. I started out with a completely different vision in my head when I started this card. It is nothing like how I intended it, but I am totally happy with how it turned out. The pumpkin image is from a retired set which I am going to miss so much. I think this is one I will continue to hang on to even though it has been retired. It is called Carved and Candlelit. I stamped the pumpkin once, masked it and stamped 2 more times. Then I added the face to each, sponged Kiwi Kiss ink around the edges and added some black brads in the corners. This card uses a lot of dimensionals. Everything is popped up, including the base layer of close to cocoa. The bat background is from a retired set called at Halloween Backgrounds and the "Boo" saying is also from a retired set called Best Fiends. (Sorry I am still waiting for my new goodies to come from Stampin' Up! - I am trying patiently to wait and not stress but I ordered well over a week ago and it hasn't even gone into picking stage yet!!!)

Happy Stamping~

Stamp set: Carved and Candlelit, Halloween Backgrounds, Best Fiends
Ink: Tangerine Tango, Kiwi Kiss, Basic Black
Card stock: Tangerine Tango, Kiwi Kiss, Close to Cocoa, WW
Other: Sponges, Dimensionals, 1-3/8" Circle Punch, 1-1/4" Circle Punch, Black Gingham Ribbon, Black Brads, Mat Pack and Paper Piercer

Monday, August 25, 2008

Tart and Tangy Folding Scrapbook

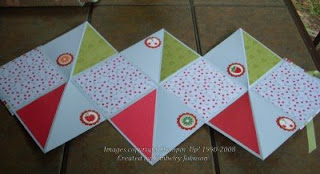
Hi Stampers! I am so excited to show you one of the projects I have been so busy making. This project was shown to me by one of my Club members (Hi Jenny!!!) and once she showed me the directions I was hooked! These are so fun and easy to make once you get the folding down. They would make great gifts for just about any occasion. The first picture is taken with the book closed and the ribbon tied around it. I will probably add something to the front cover, but I just haven't decided what yet.

This is a picture of the book once it is completely open. Isn't it cute? Just think of all the possibilities you could have adding pictures and journaling in the open spaces.


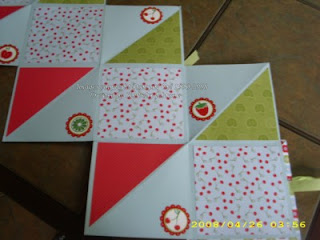
This last picture is of a closer view of one of the sections. I am so glad that Tart & Tangy and the Summer Picnic DSP made it into the new catalog. I plan to make a bunch of these for family and friends to put all their summer pictures and memories in.

Happy Stamping~


Stamp set: Tart & Tangy
Ink: Stampin' Write Markers

Card stock: Bashful Blue, Real Red, Certain Celery, WW, Summer Picnic DSP

Other: Mat Board, Ribbon, Sticky Strip,White gel pen, Scallop Punch, Circle Punches, bone folder, scoring blade

Sunday, August 24, 2008

Halloween is in the Air

Hi Stampers! I must still have Halloween on the brain after creating the adorable Frankie cards the other day. I pulled out my Haunting Halloween set and made these really cute cards. Both cards have the image stamped in basic black ink and then are colored in using Stampin' Write Markers. I LOVE Stampin' Up!'s markers and will never switch to another brand. The colors are so vivid and I love the fact that there is a brush tip and a finer tip on each marker. It's like having 2 markers in one!!! The first card also features the new scallop border punch. It makes creating scalloped borders so much easier now. I also sponged all the edges on each layer of card stock to give it a "spookier" feel. I tried using the stamping sponges (found on page 193 in the current catalog) instead of the sponge daubers I normally use. WOW! What a difference. I think I will be switching to sponges for all my distressing and sponging needs. I was able to get a more even coverage using the sponges than with my daubers AND they are more cost effective for me since I cut the sponge up into 6 smaller pieces. I can get 18 sponges for just $3.50!!! You can't beat that!

The second card is very similar to the first. I just switched out color layers and added some ribbon to the bottom. All layers on this card were also sponged with the stamping sponges and Lovely Lilac Ink.


Happy Stamping~


Stamp set: Haunting Halloween

Ink: Basic Black, Gable Green, Lovely Lilac, Stampin' Write Markers

Cad stock: Gable Green, Only Orange, Lovely Lilac, WW

Other: Scallop Edge Punch, Ticket Corner Punch, Stamping Sponges, Pumpkin Pie Grosgrain Ribbon, Green Grosgrain Ribbon (retired)

Saturday, August 23, 2008

A Frankie Challenge

Hi Stampers! I'd like to introduce you to the Frankies. :0) This past week while I was surfing the usual blogs I love I came across a challenge from Dawn Griffith to re-create the adorable Frankie card she had made. She got the idea from another fellow demo while at convention. To check out her post and to play along click HERE. I fell in love with the card and decided to play along with the challenge and create my own version of Frankie. I came up with 2 versions. Which one do you prefer?
This is Frankie #1. I added simple silver brads to his neck to create his "bolts". I think this is the one I am leaning towards since it would still fit inside a regular A2 sized envelope without having to fold in the side pieces like on Frankie #2.
This is Frankie #2. He has small pieces of Elegant Eggplant attached to the side of his neck using silver brads to create his "bolts". Dawn used the My Way punch from Stampin' Up! to create her bolts, but that is one of the punches I have not invested in yet so I had to improvise. I also used the large oval punch and the 3/4" circle punches for the eyes and nose instead of the circle punches Dawn used. I still think he turned out really cute and can't wait to send these out to all my family and friends for Halloween.
Happy Stamping~
Stamp set: None
Ink: Old Olive, Basic Black Stampin' Write Marker
Card stock: Old Olive, Basic Black, WW, Elegant Eggplant
Other: Large Oval Punch, 3/4" Circle Punch, Silver Brads, sponges, scissors, dimensionals


Friday, August 15, 2008

Popsicle - Good Enough to Eat!


Hi Stampers! With school starting here next week it seems our summer has come to an end. The boys are both very excited to be heading back to school this year which will hopefully make things that much easier when the alarm clock goes off on Monday morning! I can't believe that I have a freshman in the house now. Where has time gone? I feel so old!

DJ has been training so hard since we got back from Nationals. One of the local newspapers called and interviewed him & I last week and I was amazed at how the article turned out. The article was 3/4 of a full page!! Of course - proud mom had to run out and buy all the copies she could find! He will try out for the National Team September 5-7, 2008. Please keep him in your thoughts and prayers. To view a copy of the article click here.

Today's card hangs on to the summer feeling. I saw these card being made all over various blogs and decided it was finally time for me to make one of my own. We also made these at the last stamp-a-stack and the girls loved the idea. This would be a great card for a kids summer birthday party, a summer get together or even a family reunion invite.

Happy Stamping~

Stamp set: Tart & Tangy, A Little Birthday Cheer

Ink: Wild Wasabi, Basic Black

Card stock: Wild Wasabi, WW

Other: Popsicle stick, Scallop Punch, 1-3/8" Circle Punch, 1-1/4" Circle Punch, Striped Wild Wasabi Ribbon

Stamping and Scrapping Clubs Now Forming!!!

Want an easy way to increase your stamping and scrapping supplies without breaking the bank? New stamping and scrapping clubs are now forming and will start in September. This is an easy way to increase your supplies over a period of time and also take advantage of the hostess benefits without having to host a workshop.

Stampers 10 Club: This is a group of 10 stampers who agree to spend $15 (before tax & shipping) each month for 10 months. The hostess benefits will rotate each month to a new member. Club members are guaranteed 1 Level 1 hostess set (exclusive to Stampin'Up! Workshop hostesses) and $15 in free product of your choice. Each month the club will meet at my home to turn in their monthly order, chat with fellow stampers and create a FREE make-and take project. Anyone who is unable to attend the meeting can still email or phone in their orders and payment to me by the night of the club meeting. Out of state members are always welcome as well. In addition to all the great hostess benefits, club members will also receive exclusive club split offers, specials and discounts on classes in my home. Want to earn even more FREE items- host a workshop in your home the month you are hostess prior to the club meeting, gather outside orders or sign up for more than one spot in the club!

Scrappers 6 Club: This is a group of 6 scrappers who agree to spend $25 (before tax & shipping) each month for 6 months. The hostess benefits will rotate each month to a new member. Club members are guaranteed 1 Level 1 hostess set (exclusive to Stampin'Up! Workshop hostesses) and $15 in free product of your choice. Each month the club will meet at my home to turn in their monthly order, chat with fellow scrappers and create a FREE 12 x 12 layout. Anyone who is unable to attend the meeting can still email or phone in their orders and payment to me by the night of the club meeting. Out of state memebers are always welcome as well. In addition to all the great hostess benefits, club members will also receive exclusive club split offers, specials and discounts on classes in my home. Want to earn even more FREE items- host a workshop in your home prior to the club meeting, gather outside orders or sign up for more than one spot in the club!

Please do not sign up for one of these clubs if you feel you will not be able to honor your monthly commitment for the time alloted. Clubs will be starting in September. Spots are limited so sign up today to reserve yours!

Want to earn a FREE Classic ink pad of your choice? Refer a freind to me and when they spend $40 in product (before tax & shipping) you will receive a FREE classic ink pad of your choice. Join my Creative Stamping Team and receive a FREE pack of Designer Series Paper of your choice.

Tuesday, August 12, 2008

Be Happy!

Hi stampers! Today's card is one of the cards we made at the last stamp-a-stack class. This card was a bit out of my comfort zone for me. I love how the card turned out, but admit that the colors are not my normal preference. I think I tend to migrate toward the rich regals and soft subtles more that the bold brights. Once again this set features a set found on the dormant list which is still available even though it is not pictured in the catalog. One thing I have noticed when working with the brighter colors is that a little bit of detail colored or added with the white gel pen really subdues the brightness. On this card I stamped the flower image in basic black and then colored in just the centers of each flower using the white gel pen. Then I added some white doodle dots the the panel and again on the main image panel as well. It just tied the entire card together. My challenge for you is to try using colors outside of your comfort zone and see what you can create. You may be pleasantly surprised!

Happy Stamping~

Stamp set: Just B
Ink: Basic Black
Card stock: Pink Passion, Basic Black, WW
Other: Black Gingham Ribbon, White Gel Pen, Small & Large oval punch, Key Tag punch, dimensionals

Peek-a-Boo Cards

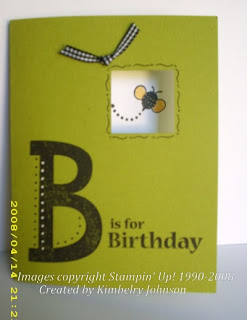
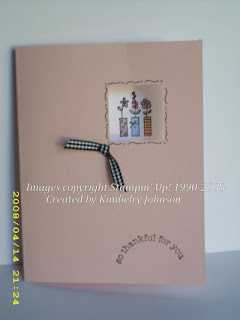
Hi everyone! I finally had some time to sit down and stamp a little over the past few days. The ladies that attended my stamp-a-stack on Saturday really inspired me. We had a great time. One of the cards we made was a card I like to call the "peek-a-boo" card. It features a little window with an image. When you open the card up the image is still visible on the inside of the card. This is a super quick and easy card to make. The end results are fabulous. The card shown above features the new Kiwi Kiss card stock and the Just B stamp set.This set is still available even though it is not included in the new catalog. To view a copy of the sets which are on the dormant list click here. These stamp sets are still available to purchase, but will not be found in the new catalog. I have had it for some time now and need to use it more!

The basic layout of the card allows for the use of any stamp to show through. This card features the new level 3 hostess set called Window Dressing. The images in this set are so cute and so versatile. Contact me today to find out how you can earn this set for FREE!!!!
Happy Stamping~
Stamp set: Just B, Window Dressing (level 3 hostess)
Ink: Basic Black
Card stock: Kiwi Kiss, Pink Pirouette, WW
Other: 1-1/4" Square Punch, Black Gingham Ribbon, Stampin ' Write Markers, White gel pen

Monday, August 11, 2008

Stampin' Up!'s Big Shot

I’m so excited to announce that Stampin’ Up! has partnered with Sizzix to bring us the Sizzix Big Shot for Stampin’ Up! The Big Shot is a sturdy manual die cutting machine used to die cut materials for use on crafts, home décor projects, and even clothing– as you can see, it’s a big deal! You’ll love what the Big Shot machine, a 6-time winner of Creating Keepsakes Reader’s Choice Award for best die cutting equipment and dies, can do for you.

The Big Shot will be available to order on September 2nd, so make sure to mark your calendar to order your Big Shot. There will be select sizzix die cuts and exclusive die cuts available with the Big Shot. Stampin’ Up will also be coming out with even more fantastic die cuts in future publications.

New 2008-2009 Fall & Winter Idea Books Are Here!!!

It is that time again! The new catalogs from Stampin' Up! have arrived and they are full of new ideas and goodies. The new sets in the catalog are amazing, the new designer papers are wonderful, the punches are inspiring and the the new ribbons are to die for. You won't want to miss out. Catalogs are $9.95 - or host a workshop and get one FREE!! I will ship catalogs via priority mail for an additional $4.80. Contact me today to get your copy.

Happy Stamping~

Starter Kit Promotion - $99

Becoming a Stampin' Up! Demonstrator has never been easier! Starting Aug 11th SU! is offering 3 types of starter kits in addition to our regular priced Starter Kit. These Kits have 3 different focuses. It all depends of your style and each one is $99.

1. Stamp Focused Starter Kit
2. Scrapbook Focused Starter Kit
3. Home Decor Focused Starter Kit

If you want even more product select our standard $199 kit and receive a stamp set of your choice from the catalog for free!!! The first 2 people to join my team during the month of August will also receive a special gift from me. Click here for the flyer with all the details. If you have any questions please don't hesitate to ask. I would love it if you joined my team!

Happy Stamping~